|
Photographers: How To Create Beautiful Photo Montage Prints
Photographers: Create Photo Montage Prints For Memorable Family Events
|
Photo Montage Prints Make
Wonderful Centerpieces
For Important Family Events
|
|
|
How To Create Your Own Photo Montage
You'll be using the design features of our free ROES (Remote
Order Entry System) software to create your print.
- Click to download our ROES software into your Mac or PC.
- Choose the paper surface you want by clicking on the ROES Home Page. We suggest either Color Corrected or Uncorrected Lustre prints because the paper is writable with a felt tip pen (so that party guests can sign the print.) But, any paper surface can be chosen. If you choose "color corrected" we will correct each of the photos in your montage.
- Go to the Design Your Own tab and select the size print you want by clicking on it. The most popular sizes are 16" x 20", 20" x 24" and 20" x 30". Our templates are set up as horizontals (landscape). By clicking a rotational button you can change our template to a vertical, portrait setting.
You'll see add options. Click on Product Options. Then, Montage.
This layout chart will appear:
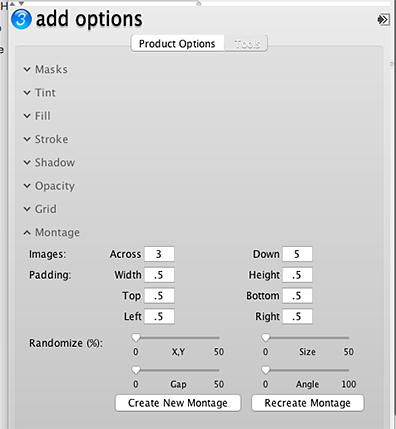
The settings shown here will produce a nice layout for a 20" x 24" vertical montage. It will have 3 images across and 5 down. The photos will be inset 1/2" from the print edge and there will be 1/2" between them. These settings are just shown as an example. Feel free to choose any settings you want.
-
Click Create New Montage to see how your montage will look.
-
To make changes in the montage simply key in different settings and click Recreate Montage.
-
Use other settings within Product Options to add borders (Stroke) change the color of your background (Fill) or place drop-shadows around your images (Stroke).
-
Now is the fun part. Drag your images into the picture nodes.
- Use ROES tools in the editing window to select and modify your nodes.
- If you select a node and right-click you'll see a drop-down menu that will allow you to Remove that node. Then, you can either expand other nodes or use the Text tool to add a text node to personalize your montage with type.
Tip: Once you've designed your montage you should consider saving the layout by adding it to Favorites. Then, you'll be able to use it over and over again and still be able to make small changes.
Our Goal Is To Give You Creative Choices - Making a montage should be relatively easy for pros & advanced amateurs. But, designing one may be challenging for beginners.
If designing the montage is too difficult for you we suggest you simply order separate prints & enlargements. Use ROES or our new, streamlined iPrints.com
(order from computers or cell phones.) If you're tech-challanged try our easy-to-use consumer site iPrints.
(No learning curve. Just great prints.)
Pros: Montage prints are an excellent offering for your family-oriented business. They are the perfect "design once, use many times" studio product!
If You Need Any Help...
Please call us. Do you live in South Florida? Feel free to visit our laboratory store. We'll work one-on-one with you.
Our Suggestion...
Save this newsletter so that you can refer to it if and when you're ready to make a memorable montage print!
|
|
|
|
|
2960 Simms St., Hollywood, FL 33020
(800) 327-1776 • (954) 925-0105
Customer Service Hours:
M - F 10AM - 5PM • Sat 10AM - 2PM
info@dalelabs.com
www.dalelabs.com
|
|
|
|
|
|
 | | | | | |
|  |
|
|
|
|

 |
Votes: 0
Voting..
|
|
|
|
|